What is GST?
GST is a consumption-based tax levied on the sale, manufacture, and consumption of goods and services. It has replaced all indirect taxes previously levied by the central and state governments, making it a single unified tax for the entire country.
- CGST: GST is levied on intrastate supplies by the central government.
- SGST: SGST is levied on intrastate supplies by respective state governments.
- IGST: IGST is levied on interstate supplies by the Centre(equal to CGST + SGST combined on supplies.
Output Books – GST Billing & Accounting Software
Output Books is a GST-ready accounting and billing software that allows you to create customized invoices, track expenses, and manage inventory without accounting knowledge. It generates GSTR 1, GSTR 2, and GSTR 3B reports, automating your GST workflow.
Output Books is ideal for accounting and billing across all industries. Freelancers, and small to large companies can use the software to simplify their accounting processes.
Create GST Bill in Output Books
Easily create and issue GST bills with Output Books. GST-registered suppliers can generate, print, and send invoices quickly using this simple software.
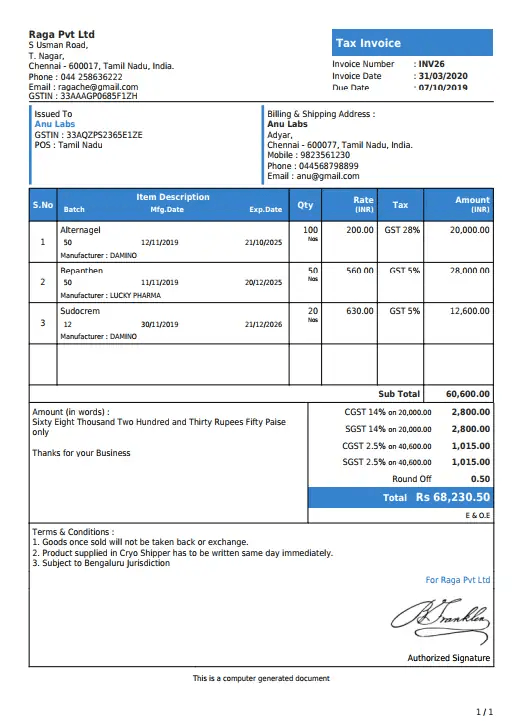
Output Books GST Bill
Steps for creating a GST bill
Here are the simple steps to create a GST Invoice in Output Books.
Step 1: Create New Invoice
To create an invoice, select the branch (if available) from the drop-down at the top right. Then, go to the left panel, open Sales > Invoice, and click “New Invoice.”
Step 2: Set Invoice date and Due date for Payment
Set the Invoice date(date of issuing invoice) using the calendar icon associated there. Next, set the due date by choosing options such as On receipt / 7days / 15 days, etc within which the payment has to be paid.
Step 3: Select Customer
Select a customer from the drop-down list. If the customer is already added, their GSTIN, billing, and shipping addresses will be displayed. To add a new customer, click “Add” and enter their details.
The place of supply will auto-populate based on the shipping address. Verify it, as it determines the tax, and change it if needed using the drop-down.
Step 4: Choose the GST Invoice Type
Select the invoice type: choose “Regular” or an export-related type if it’s an Export Invoice.
Step 5: Add Item & Generate Payment Amount
Select an item from the Items menu. Rate, HSN/SAC, units, taxes, and discounts auto-fill. Enter the quantity manually.
Step 6: Add Other Information
Enable reverse charge if applicable—recipient pays GST to the government. Round off amount, auto-load notes/terms, choose bank, assign sales rep, add attachments, and set a digital signature.
Step 7: Create GST Bill / GST Invoice
After updating the information, click “Save” to generate the GST bill. You can download the invoice as a PDF, print it, or email it directly to the customer from Output Books.